How to Use a Percolator: Stovetop, Electric and Campfire
Disclosure: We may earn a commission when you buy through links on this page, at no extra cost to you. As an Amazon Associate I earn from qualifying purchases. Learn more

How to use a percolator on the stove, plugged in or over a campfire, with tips to avoid bitter coffee.
Learning how to use a percolator is easy: fill the pot with cold water, add coarse ground coffee to the basket, heat until it starts to perk, then keep it at a gentle perk for about 7 to 10 minutes before removing the grounds. Done right, a percolator brews hot, bold, smooth coffee for a crowd. Done wrong, it turns bitter, which is why heat control and grind size matter so much.
This guide covers how a percolator works, what you need, step by step instructions for stovetop and electric percolators, campfire tips, how much coffee to use, how to avoid bitterness, cleaning and common questions.

How a Percolator Works
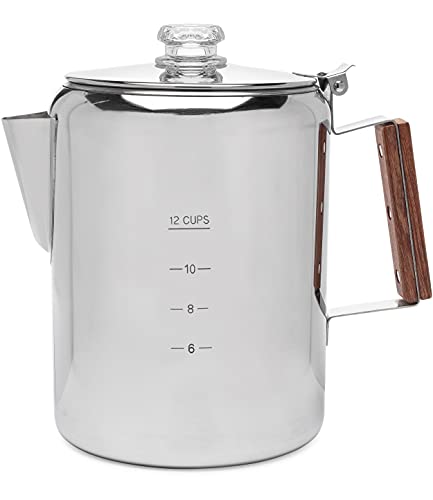
A percolator has four main parts: the pot that holds water, a vertical stem or tube, a basket that holds the coffee near the top, and a lid, often with a clear glass or plastic knob. When the water heats, pressure pushes it up the stem, where it sprays over the coffee in the basket. The brewed coffee drips back down into the pot, and the cycle repeats. Each pass extracts more flavor, so the coffee gets stronger the longer it perks.
Stovetop percolators depend on you to control heat and time. Electric percolators have a built-in thermostat that stops the cycle at the right point and then keeps coffee warm.
What You Need
- A percolator: stovetop or electric. Our guide to the best coffee percolator compares popular models.
- Coarse ground coffee: similar to French press grind.
- Cold, fresh water, ideally filtered.
- A heat source: stove, camp stove, grill or campfire for stovetop models.
- A tablespoon or scoop for measuring.
- Optional: a round paper filter for the basket to reduce sediment, and an oven mitt.
How Much Coffee to Use
A good starting point is 1 tablespoon of coarse coffee per 5 ounce cup of water, which is how most percolators measure cups. For an 8 cup pot (about 40 ounces), that is about 8 tablespoons, or roughly half a cup of grounds. Use a bit more for stronger coffee or a bit less for milder coffee. If you weigh, try about 1 gram of coffee per 15 to 16 grams of water.
How to Use a Percolator on the Stovetop
- Fill with water. Pour cold water into the pot up to the desired cup line, staying below the bottom of the basket.
- Insert the stem and basket. Seat the stem firmly in the bottom and slide the basket onto it.
- Add coffee. Add coarse grounds to the basket. Place a round paper filter in the bottom first if you want less sediment.
- Cover the basket with the spreader lid, then put on the pot lid.
- Heat on medium. Place the pot on medium heat and watch the glass knob.
- Watch for the first perk. When you see water bubbling up into the knob, the brewing has started.
- Lower the heat. Reduce to low or medium low so it perks gently, about once every two or three seconds. Rapid, violent perking means the heat is too high.
- Perk for 7 to 10 minutes. Watch the color in the knob; it should turn a rich brown.
- Remove from heat. Take the pot off the burner.
- Remove the basket. Carefully lift out the stem and basket so the grounds stop dripping into the coffee.
- Serve. Pour and enjoy.
How to Use an Electric Percolator
- Fill with cold water to the cup marking inside the pot.
- Insert the stem and basket, making sure the stem sits firmly on the heating well.
- Add coarse coffee to the basket and cover it with the basket lid.
- Put on the pot lid and plug in or switch on.
- Wait for the ready light or until perking stops, usually about one minute per cup.
- Remove the basket soon after brewing for the best flavor.
- Serve while the percolator keeps the rest warm.
Electric models brew consistently because the thermostat controls the cycle. Compare models in our guide to the best electric percolator.
Using a Percolator Over a Campfire
Percolators are classic camping coffee makers. Set the pot on a sturdy grate over hot coals rather than tall flames, which can scorch the coffee and overheat the handle. Move the pot to the edge of the grate once it starts perking to keep the perk gentle. Use a heat resistant glove; metal handles get very hot over a fire. Perk for about 7 to 10 minutes, then remove the basket and let the grounds settle before pouring.
How to Avoid Bitter Percolator Coffee
- Use a coarse grind. Fine grounds slip through the basket and over extract.
- Keep the perk gentle. High heat causes rapid perking that pulls out harsh flavors.
- Do not over perk. Stop at about 10 minutes for most stovetop pots.
- Remove the basket immediately after brewing.
- Choose medium roasts. Very dark roasts can taste harsh after repeated brewing.
- Keep the percolator clean. Old oils in the stem and basket add bitterness.
Adjusting Strength
For stronger coffee, add more grounds or perk a minute or two longer, but avoid going far beyond 10 minutes. For milder coffee, use fewer grounds or shorten the perk time. Changing the amount of coffee is usually a better way to adjust strength than changing time, since longer perking also adds bitterness.
Choosing Coffee for a Percolator
Medium and medium dark roasts work well, giving a classic, robust cup. Look for coffee labeled coarse or percolator grind, or grind whole beans coarse at home with a burr grinder. Standard pre-ground coffee is usually too fine and can leave sediment. Fresh coffee tastes noticeably better, so buy smaller bags and use them within a few weeks.
Cleaning Your Percolator
After each use, let the pot cool, empty the grounds and rinse the basket, stem and pot. Wash with warm soapy water, using a narrow bottle brush to scrub inside the stem, where coffee oils build up. Dry all parts before reassembling.
Every few weeks, deep clean by filling the pot with water and a few tablespoons of baking soda, or equal parts water and white vinegar, and perking it through a cycle. Then perk one or two pots of plain water to rinse. Never submerge an electric percolator's base. For more cleaning routines, see our guide on how to clean a coffee maker.
Percolator vs Other Brewers
Compared with a drip coffee maker, a percolator makes hotter, bolder coffee and works without electricity on a stove or fire, while drip coffee is cleaner and more convenient. Compared with a French press, a percolator handles larger batches and keeps coffee hot longer, while a French press gives more control over extraction. Read our percolator vs drip coffee maker comparison for more detail, and explore other methods in our coffee guides.
Safety Tips
Use a handle cover or oven mitt, since stovetop percolator handles get hot. Never let a stovetop percolator boil dry. Keep the cord of an electric percolator away from the edge of the counter, and unplug it when not in use. Let the pot cool completely before cleaning or storing it. Over a campfire, keep children and pets away from the hot pot.
Troubleshooting Common Problems
- The percolator will not perk: check that the stem is seated firmly in the bottom and that there is enough water above the minimum line.
- Coffee is weak: use more grounds, perk a minute or two longer, or check that water is not too far below the basket.
- Coffee is muddy: grind coarser or add a round paper filter to the basket.
- Coffee boils over: the heat is too high or the pot is overfilled; lower the heat and fill only to the cup line.
- Metallic or stale taste: deep clean the stem and basket, and run a cycle with plain water.
Percolator Coffee Ratios at a Glance
| Pot size | Water | Coarse coffee |
|---|---|---|
| 4 cup | About 20 oz | About 4 tablespoons |
| 6 cup | About 30 oz | About 6 tablespoons |
| 8 cup | About 40 oz | About 8 tablespoons |
| 12 cup | About 60 oz | About 12 tablespoons |
These amounts give a medium strength brew. Once you know how to use a percolator consistently, adjust by a tablespoon at a time to suit your taste.
Serving and Keeping Coffee Warm
Percolator coffee tastes best fresh. After removing the basket, keep a stovetop pot on the lowest heat or pour the coffee into a preheated thermos so it stays hot without continuing to cook. Electric percolators switch to keep warm automatically, but flavor slowly declines after an hour or two, so brew a fresh batch for long gatherings.
If you are serving a group, set out cream, sugar and a few spoons near the pot, and let guests pour their own. Percolator coffee is traditionally strong and hot, so a small pitcher of hot water lets anyone dilute their cup to taste.
With these habits in place, your percolator will brew consistently good coffee for many years, whether in your kitchen or at a campsite.
FAQs
Do I need to boil water before using a percolator?
No. Start with cold water in the pot; the percolator heats it. Some people start with hot water to speed things up, but then watch closely for the first perk.
Can I use a percolator on an induction cooktop?
Only if it is made of magnetic stainless steel and rated for induction. Many aluminum and some stainless percolators do not work on induction.
How do I clean the percolator stem?
Use a narrow bottle brush with warm soapy water to scrub inside the tube, then rinse well. Oils collect there and cause bitter flavors.
How long should I percolate coffee?
About 7 to 10 minutes of gentle perking on a stovetop. Electric percolators stop automatically.
How do I know when percolator coffee is done?
Watch the color in the glass knob. When it turns a rich brown and you have perked for 7 to 10 minutes, it is ready.
Can I use paper filters in a percolator?
Yes. Round paper filters placed in the basket reduce sediment, though they are optional.
What happens if I perk too long?
The coffee becomes bitter and harsh because the grounds are over extracted.
Can I make a small batch in a large percolator?
Yes, but stay above the minimum line, since too little water may not reach the stem properly.
Can I reheat percolator coffee?
You can warm it gently, but avoid re-percolating brewed coffee, which makes it bitter.
Final Thoughts
Now that you know how to use a percolator, you can brew classic, hearty coffee at home, at camp or for a crowd. Use coarse grounds at about 1 tablespoon per cup, heat until the first perk, keep it gentle for 7 to 10 minutes, and remove the basket right away. With a clean pot and a little attention, percolator coffee is rich and satisfying, never bitter.